Proper TXV Replacement on a Heat Pump by Magnolia Services in Jonesborough, TN
April 15, 2025
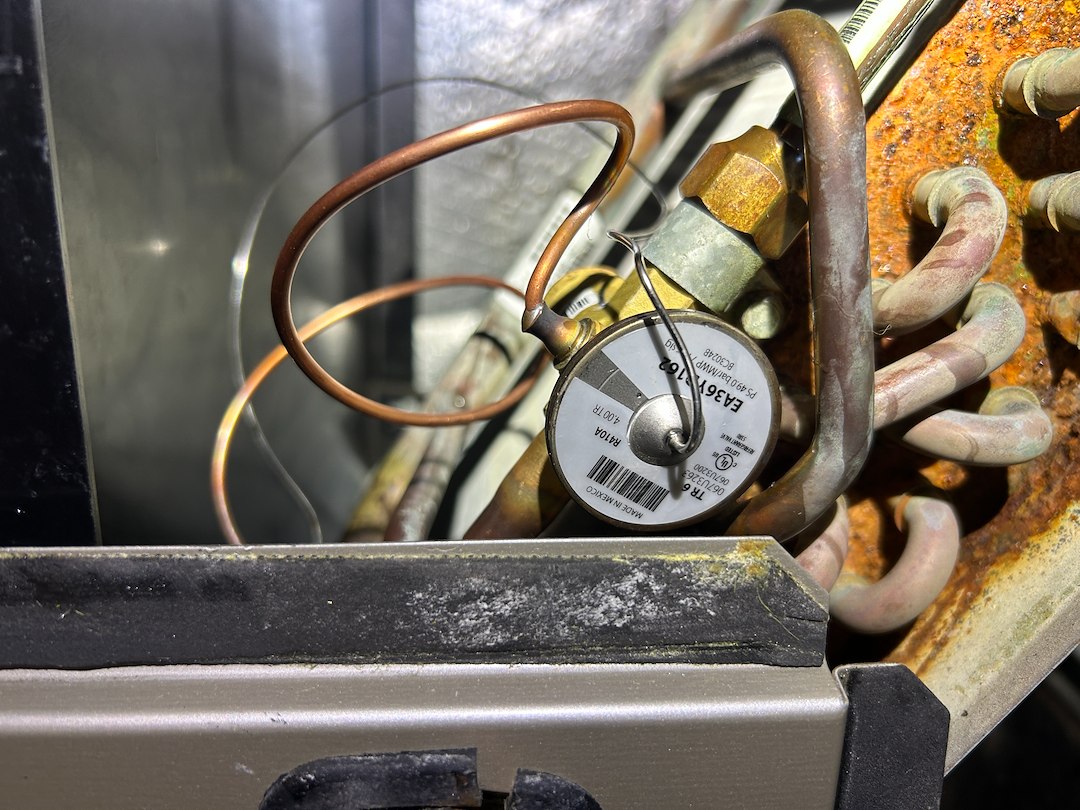
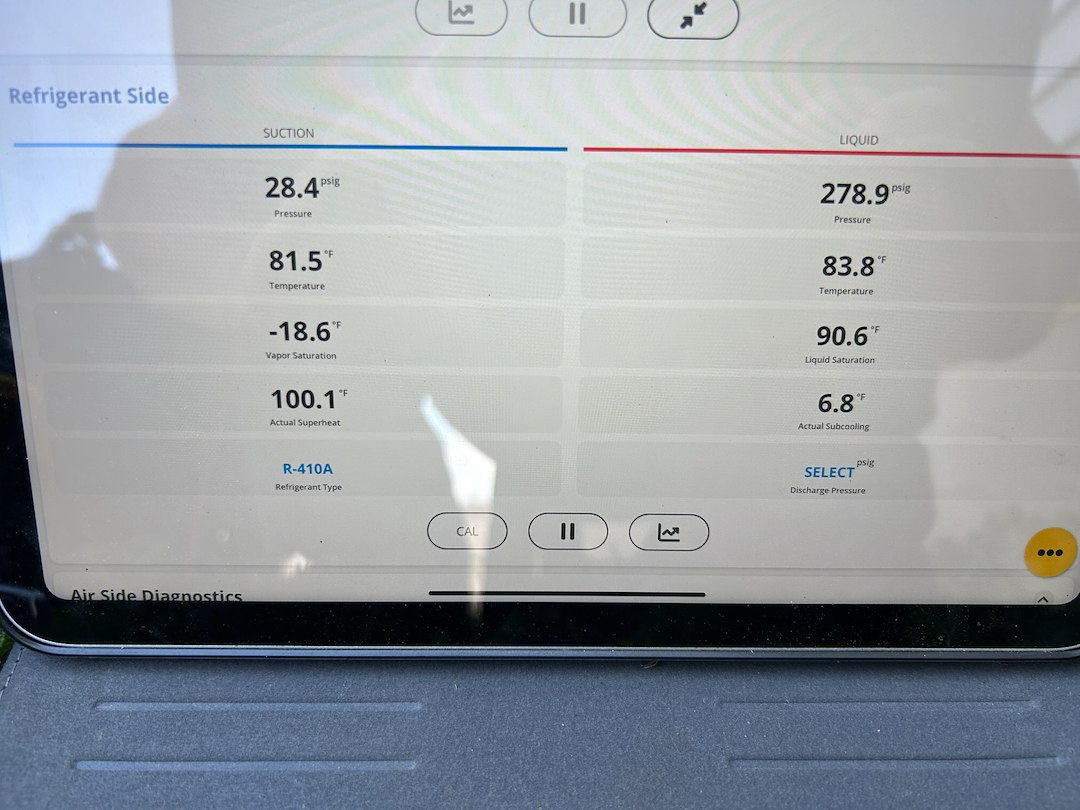
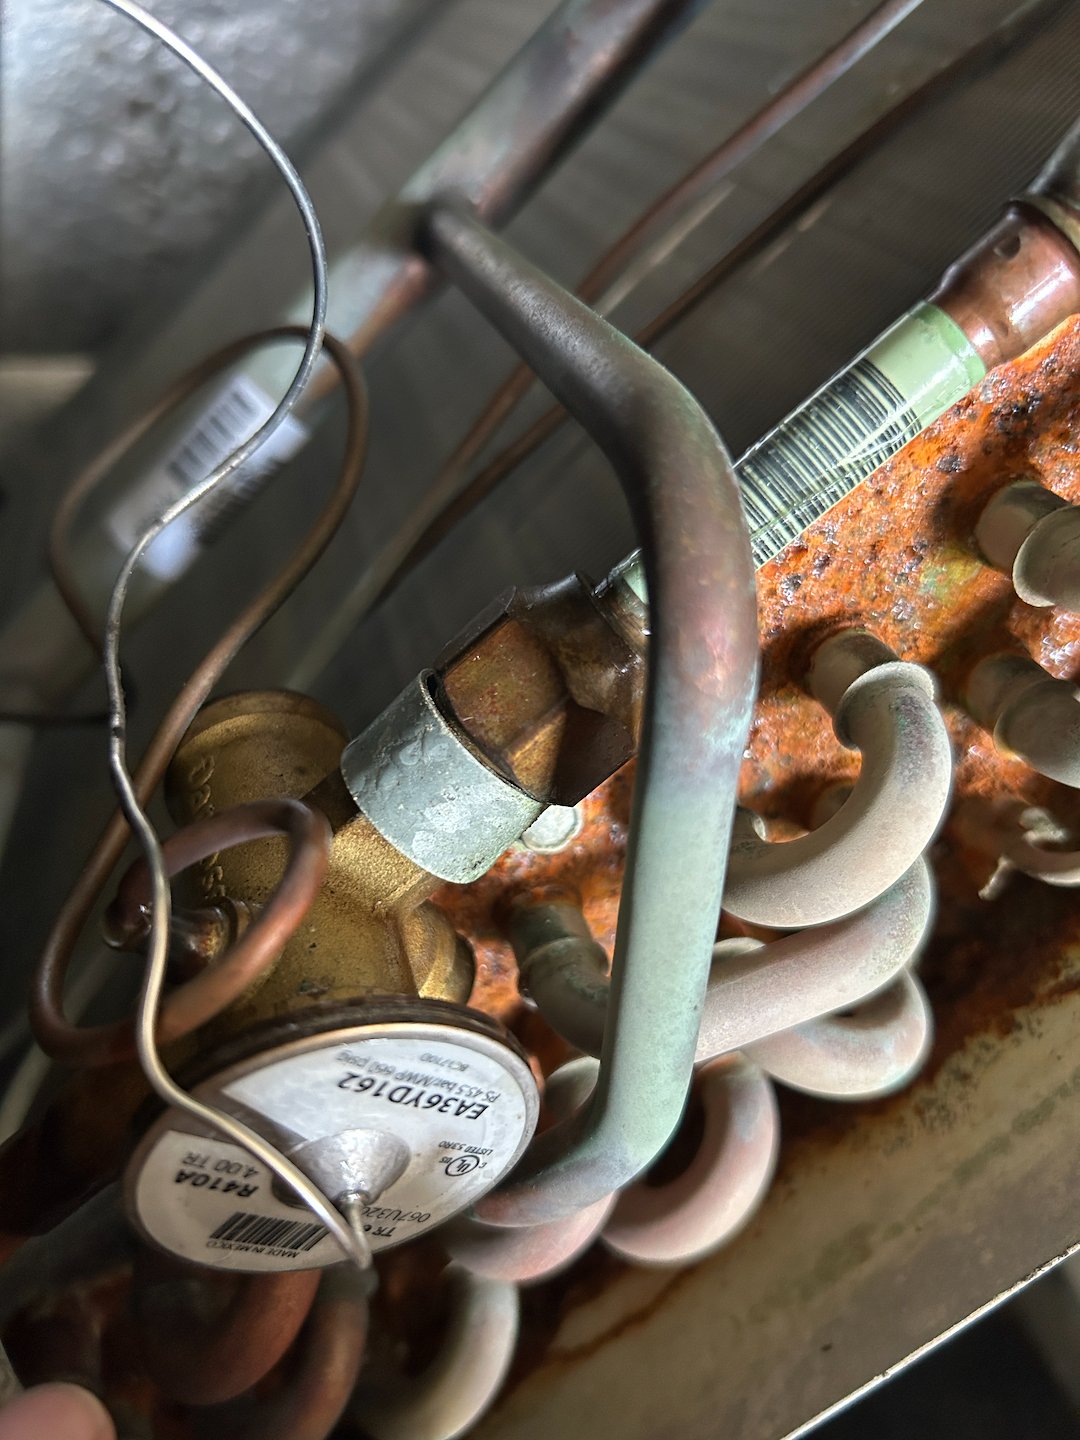
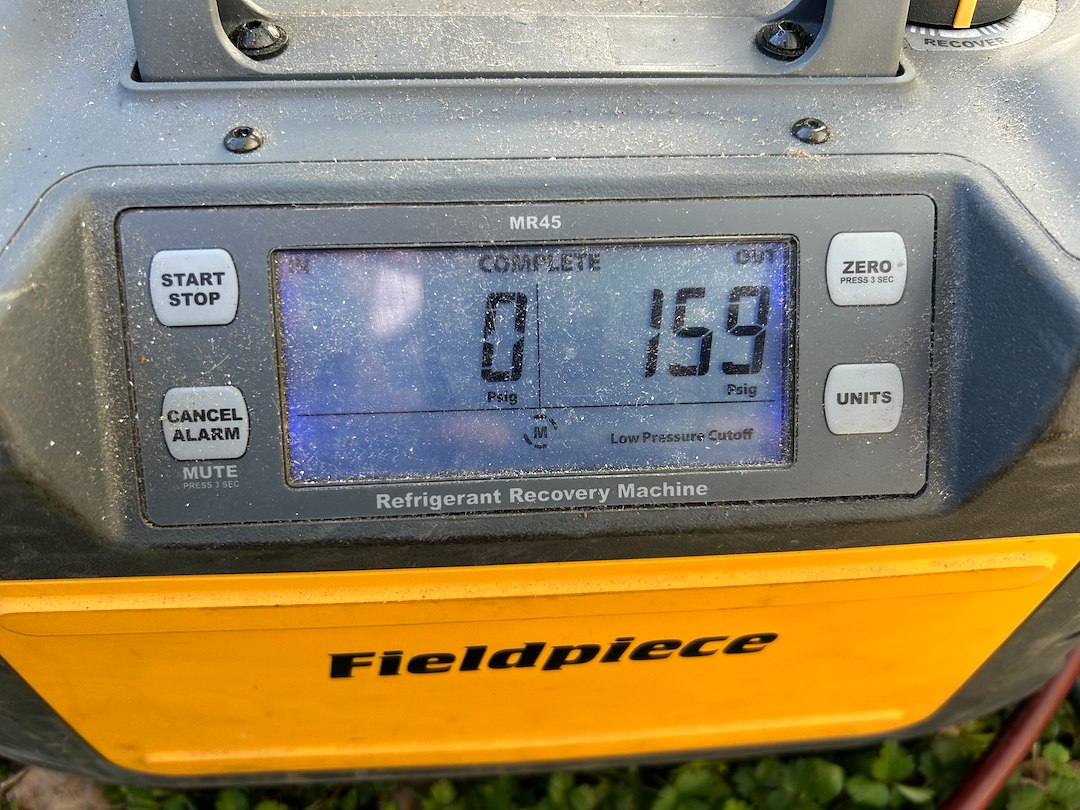
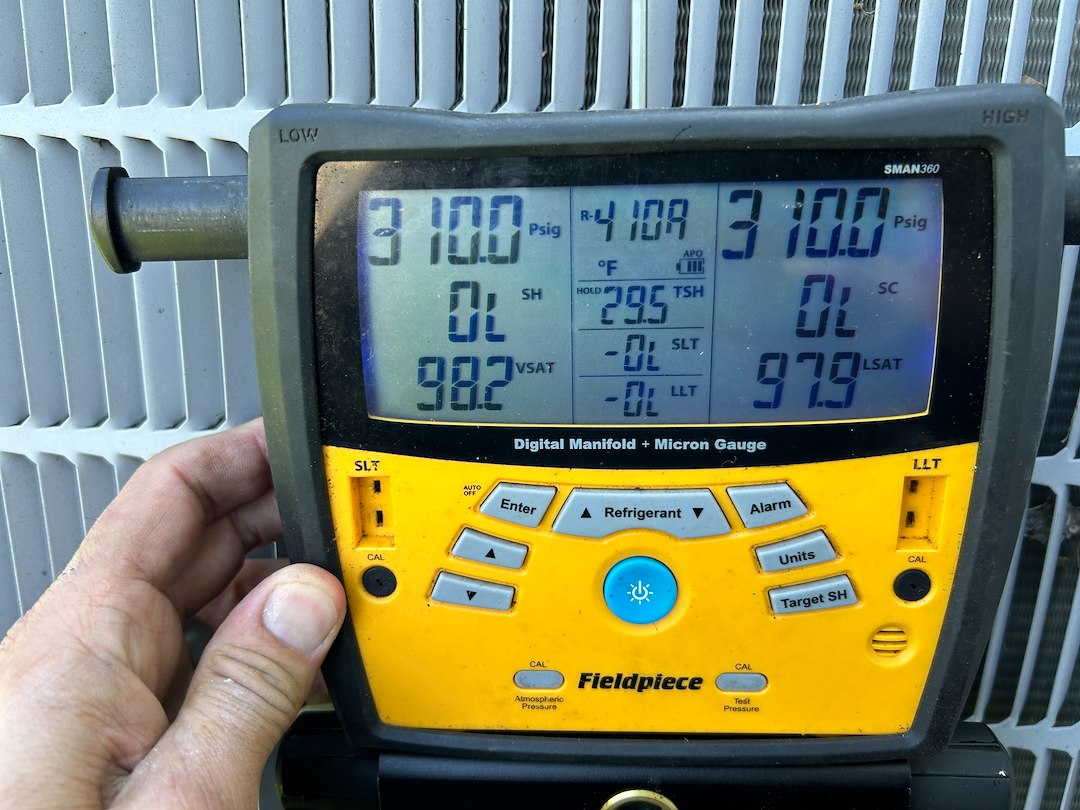
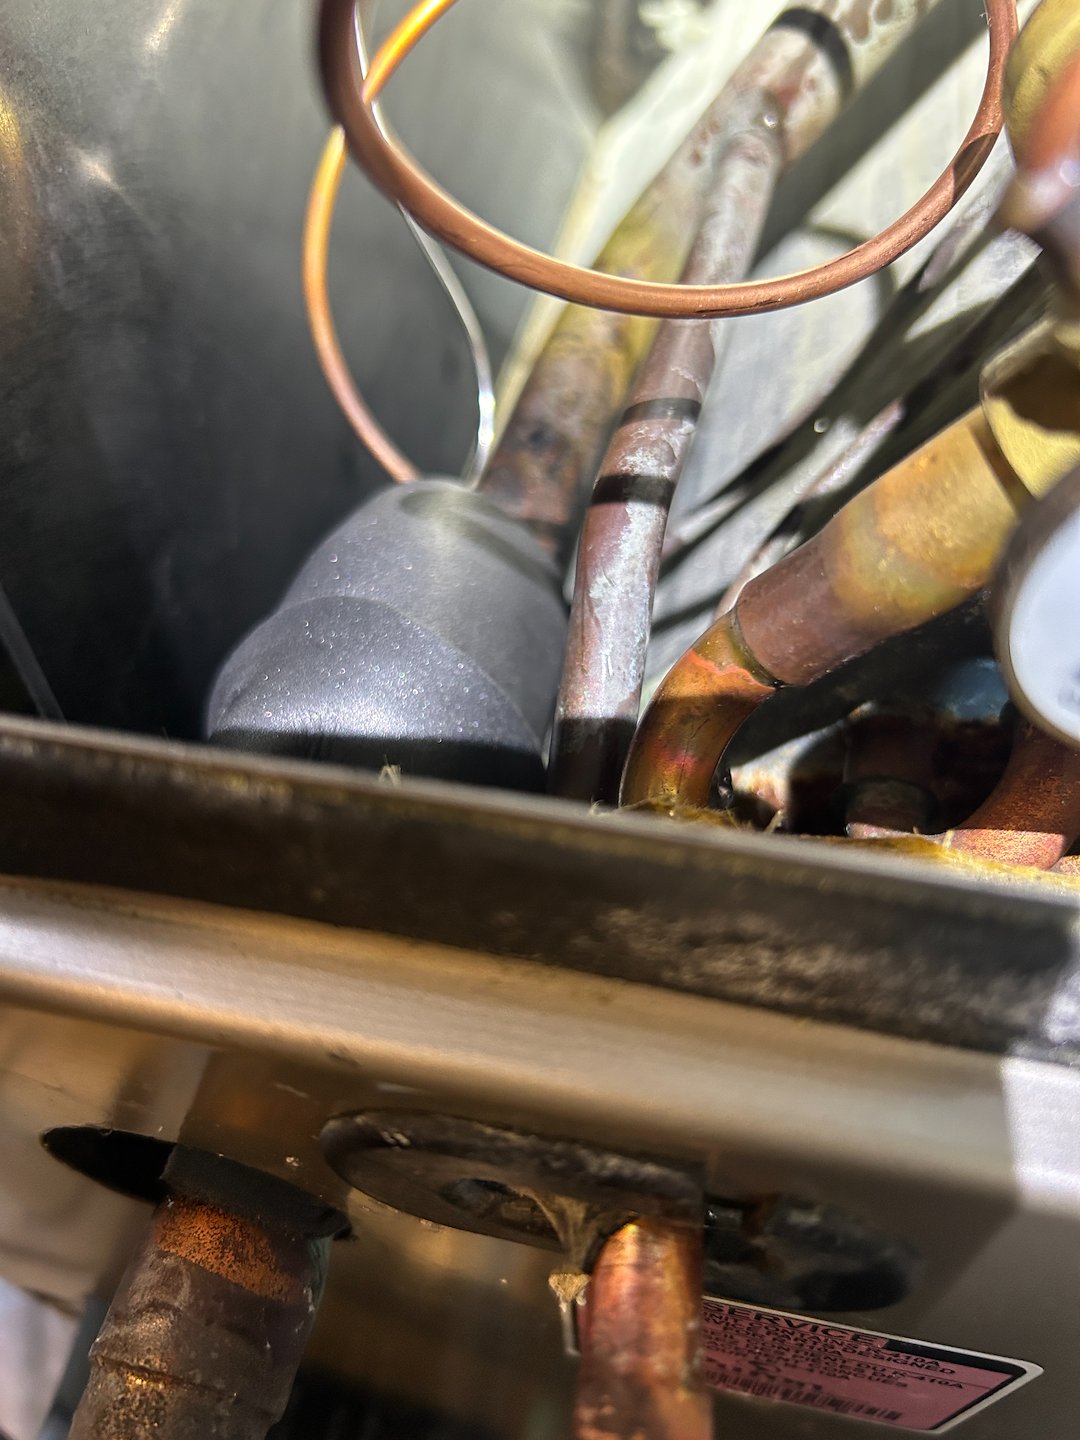
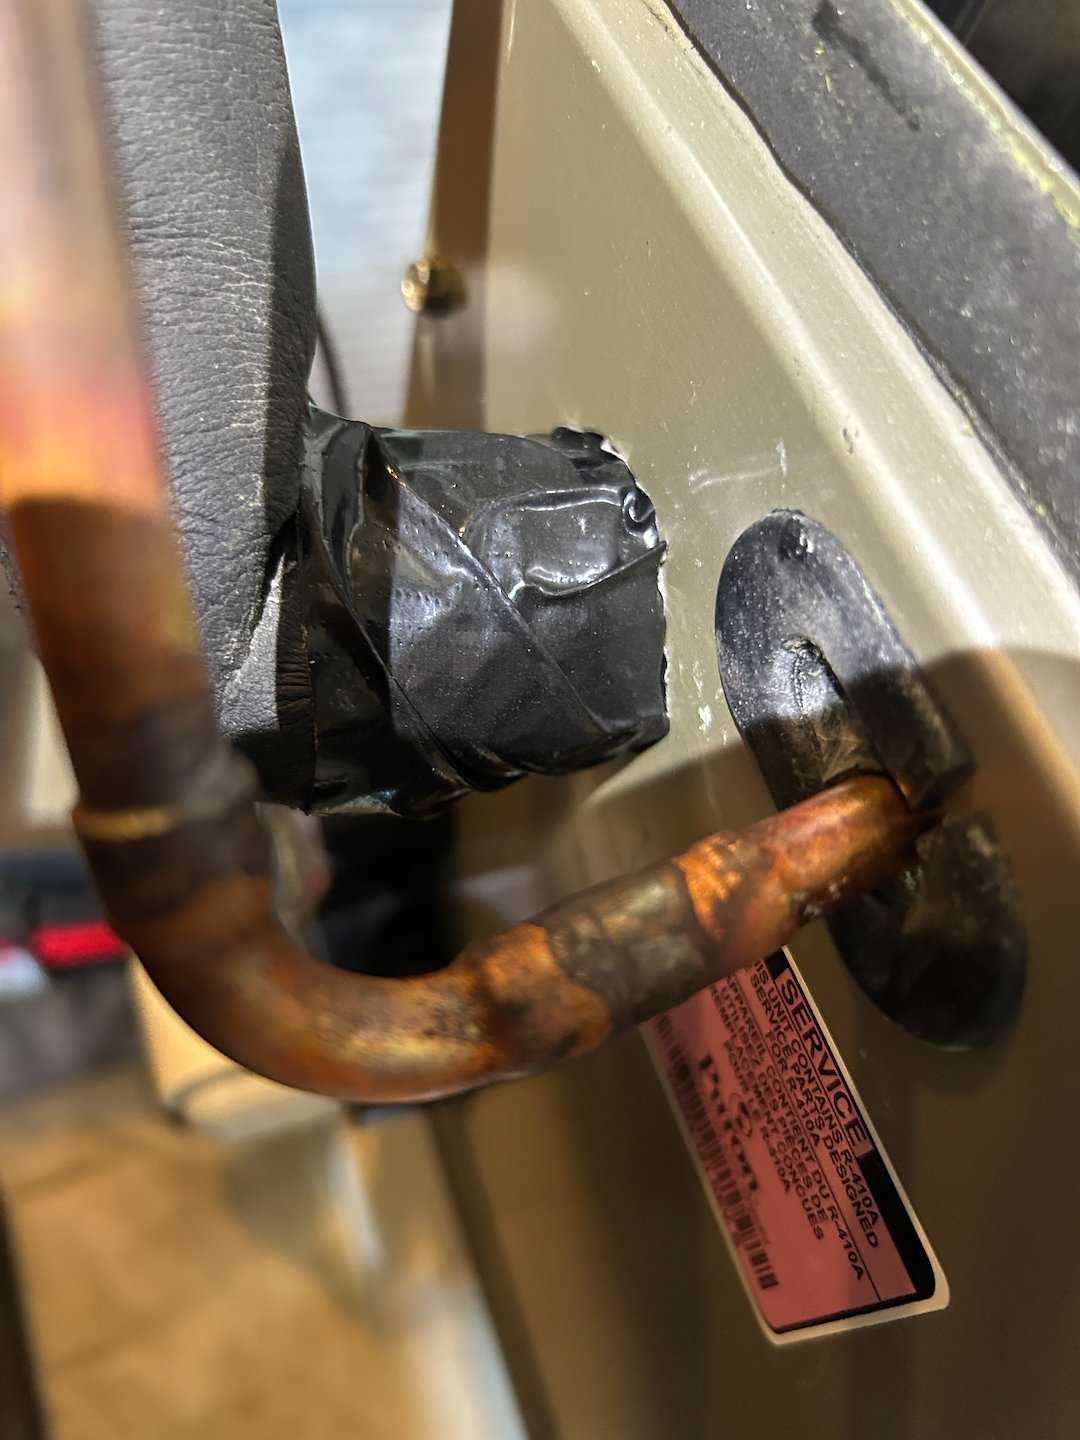
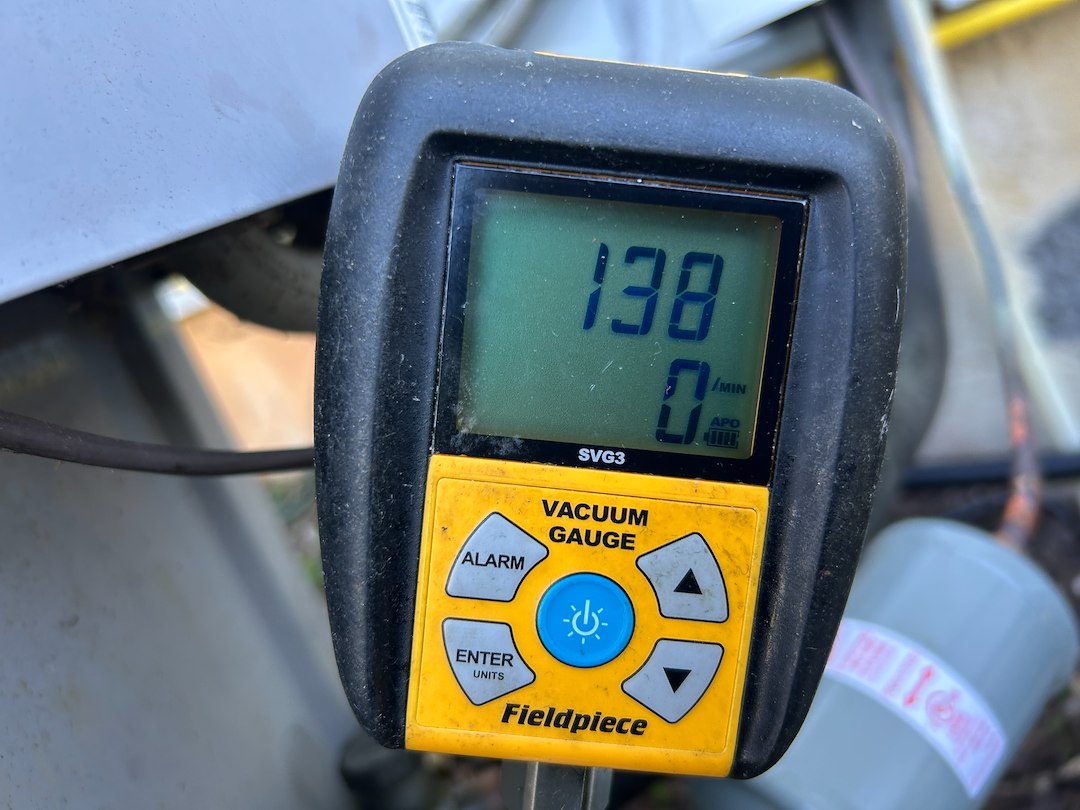
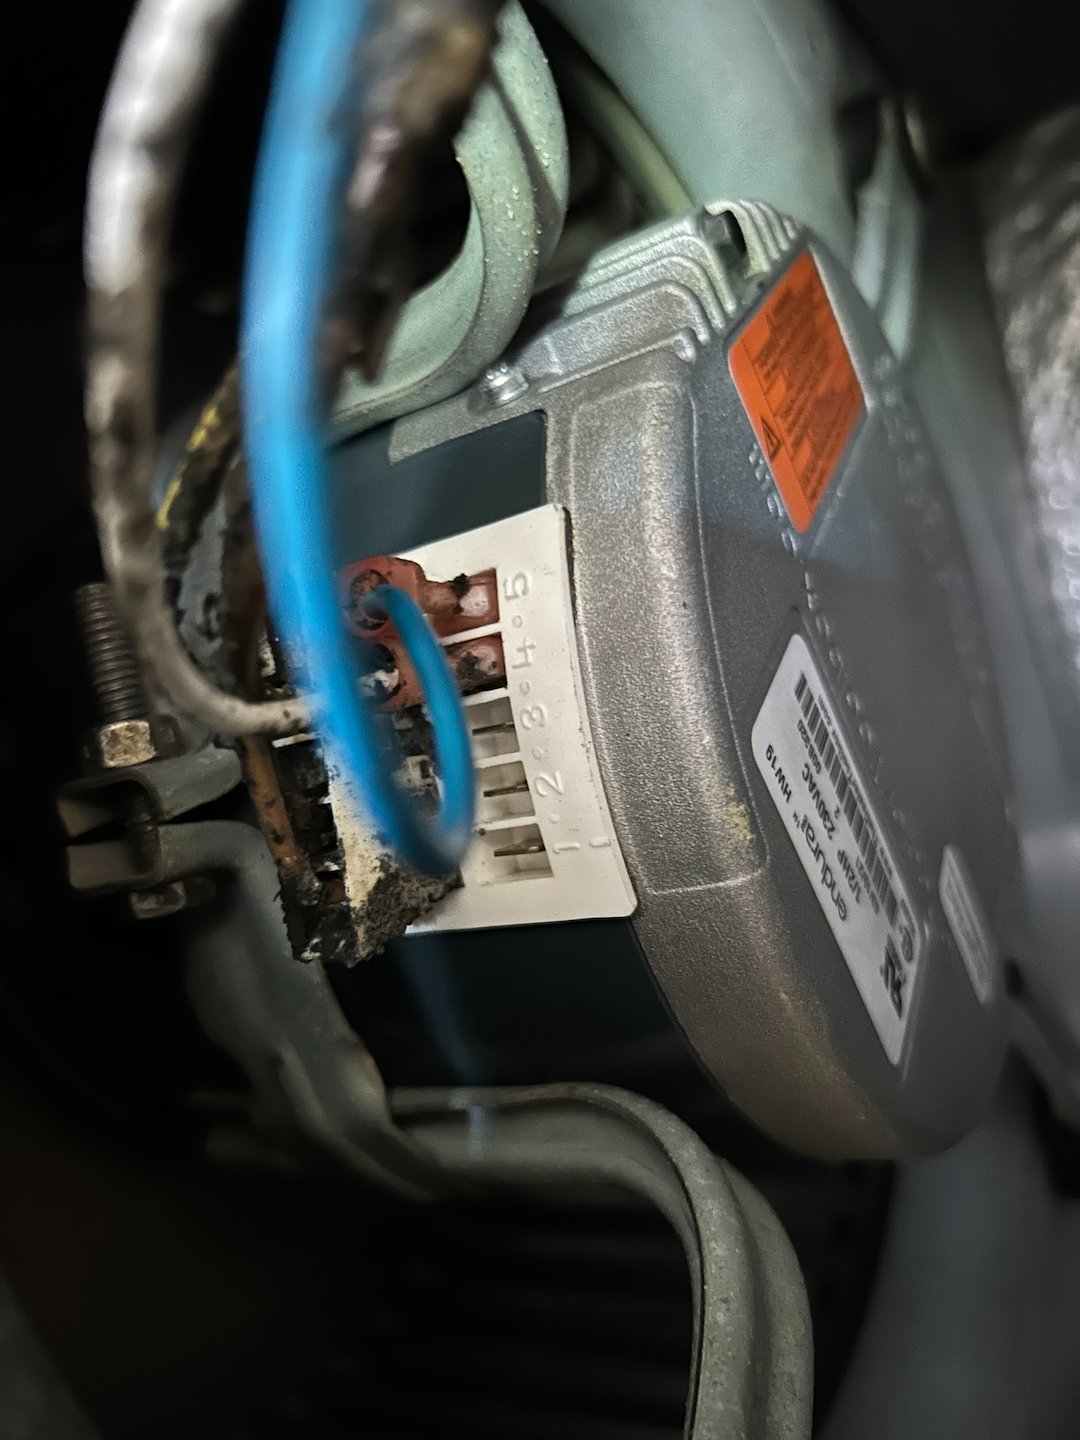
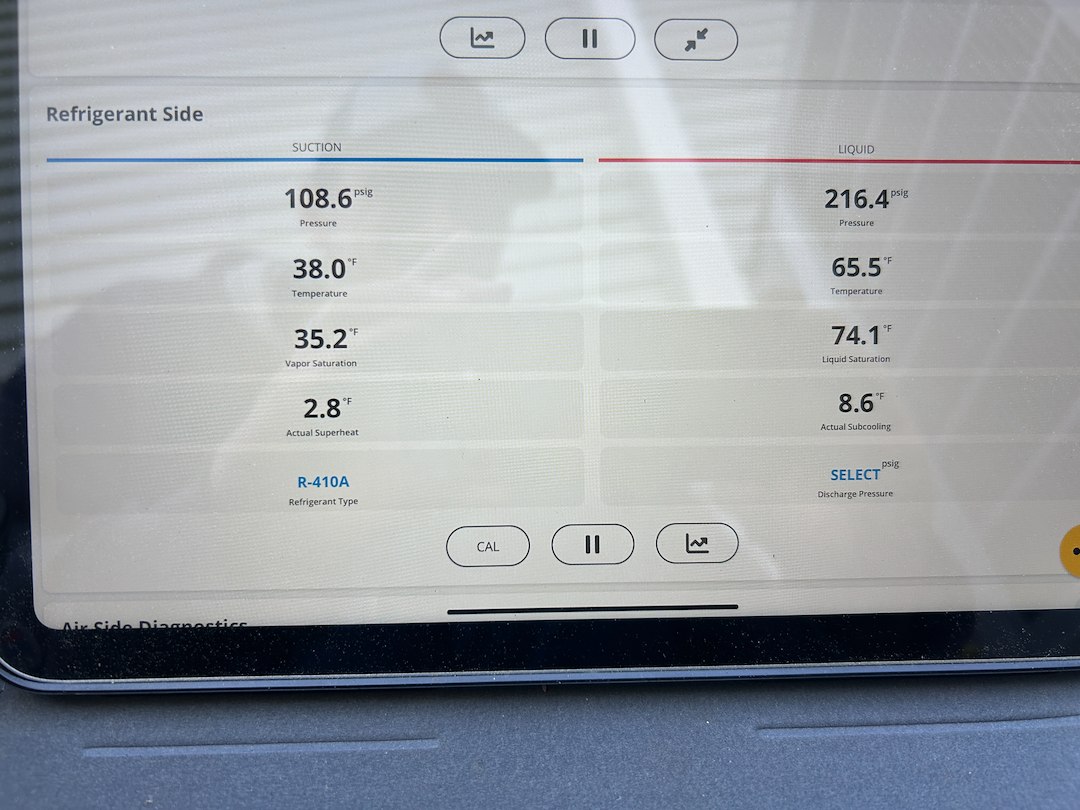
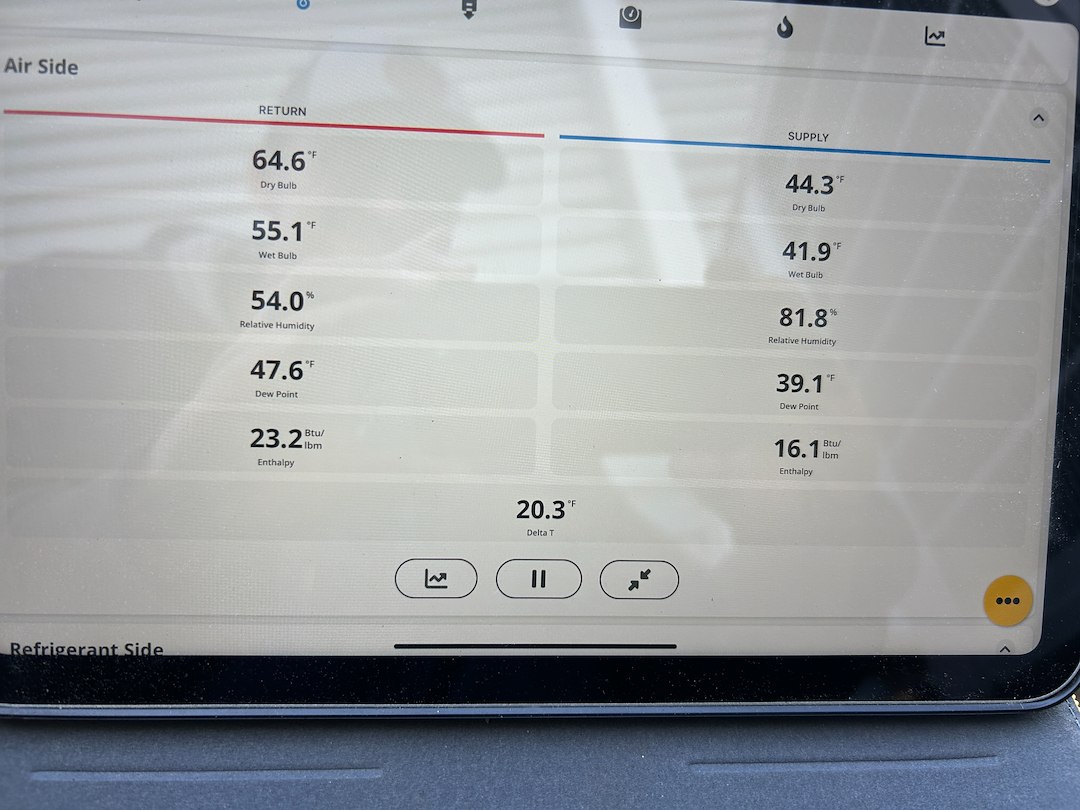
I received a call from a new customer on Saturday stating that their Carrier heat pump was not cooling well with the warmer weather we had come in on us. They said that everything seemed to be running, but it just wasn't cooling. I had numerous service calls on the books that day, but luckily I was able to fit them into the schedule. I went out to their home on Ben Gamble Road in Jonesborough. I looked at their indoor unit and thermostat to see what they had for equipment and how it was setup. I noticed that the indoor unit appeared to be low on return airflow and that the indoor blower motor was still in the factory setting of medium speed. This means that this particular unit had been operating with not enough airflow for almost 15 years, which is very rough on an AC or heat pump. Then, I went outside to their outdoor heat pump and I hooked up probes and placed probes on their return and supply inside the home as well in order to monitor the system while it was running via Bluetooth on my iPad. I had the homeowner fire up the cooling and within just a couple of minutes I knew we had a failed indoor thermostatic expansion valve or TXV. The indoor TXV was not opening which was causing very low suction pressure and very high superheat which will cause a no cooling situation, damage the compressor, and can also hurt defrost operation during the heat mode. The heat pump on Ben Gamble Road in Jonesborough, TN was in need of a heat pump repair before further damage was done to the system. I pulled the outdoor disconnect to turn off the outdoor heat pump and turned off the call from the thermostat for cooling. I had to contact the Carrier supply house on Monday in order to check availability of the indoor TXV and a bi-flow liquid line filter drier. I provided the customer with a quote for the job and it was approved. In order to save some cost the customer decided to re-use the R410A refrigerant that was inside the system which allowed me to close the service valves on the outdoor heat pump and only recover the refrigerant that was inside the line-set and indoor coil. Closing off the outdoor heat pump also allowed us to save some labor costs on the evacuation process later on in the day as well. I removed the refrigerant from the line-set and indoor coil with my recovery machine, dedicated recovery cylinder, and scale to weigh the refrigerant that I had to remove from the system. I removed the heat pump's Schrader valve cores on the suction and liquid lines. I hooked up dry nitrogen to the system and swept the line-set and coil first and then set my regulator to braze. I was flowing dry nitrogen through the system and out the other side so that I could sweat out the equalizing tube on the indoor coil without having soot buildup inside the system. I went inside and removed the TXV. I installed the new TXV in it's place, cut out the exterior bi-flow liquid line filter drier, and brazed a new one in it's place with some new copper in order to make it fit properly. Then, I pressurized the line-set and indoor coil with 310 psi of dry nitrogen in order to pressure test the system. I used a micro leak detector bubble solution on my brazed & mechanical joints in order to confirm that I didn't have any leaks. No bubbles, no troubles. I let the dry nitrogen hold for 15-20 minutes and confirmed that my pressures did not drop. I removed the dry nitrogen from the system and began the evacuation process of pulling a vacuum down below 500 microns. While the vacuum pump was running, I sanded the suction line to expose clean copper for the TXV bulb to sit on, secured the bulb with a new strap, I used brand new foam tape in order to properly insulate the bulb for more accurate readings, I put the drain line back together, closed off the previously wide open suction line penetration into the indoor coil, and I also gave the indoor coil a dry clean with my coil brush to remove debris from it. During the evacuation process, I broke the vacuum with a dry nitrogen sweep in order to further dry the system out, level out any oil pockets, and to push contaminants out of the system. I continued the evacuation process and would occasionally check my progress by valving off the vacuum pump to check my micron reading and decay rate. Just because a vacuum pump pulls below 500 microns does not mean that the system is dry enough to release the refrigerant into it, which is something many guys rush. I never rush my vacuum process because a nice tight dry system is the end goal. If you rush the vacuum process and leave moisture in the system, you will have expensive issues in the future to address. After almost 2 hours of evacuation time, I valved off my vacuum pump again and it steadied out at 138 microns with zero rate of rise per minute. My micron gauge held at 138 microns during the decay test, which means that we had a nice dry system. I opened the service valves on the outdoor heat pump nice and slow in order to break the vacuum on the system. I restored high voltage to the outdoor unit to allow the crankcase heater to start heating the compressor oil while I cleaned up and installed new Schrader valve cores on the suction and liquid lines. After awhile, I restored power to the indoor unit, hooked up probes inside and outside in order to monitor the system, and fired the heat pump in cooling mode. I took an inrush amp reading on the compressor at startup. I weighed back in the refrigerant that I removed from the system during the recovery process. I took amp draws while running on the compressor and outdoor fan motor and continued to monitor the system. My probes were telling me that the indoor unit was not moving nearly enough airflow. I had over 25 degrees of temperature split between return and supply rather quickly, my indoor coil temperature was too low, and I had a negative superheat value which means the system was flooding back liquid refrigerant to the compressor. I had to shut the system down and adjust the indoor blower speed up to tap 3 or high speed. After looking at the return ducting further, I knew we didn't have nearly enough airflow delivery to the indoor unit in order to properly run the system at its design parameters. Before starting the system back up, I adjusted the blower motor to its highest speed or tap 5 high static setting. I fired the unit in cool mode again and monitored the system for about 20 minutes of run time. We did have low indoor and outdoor ambient conditions, but with the blower speed maxed out, we were able to register some superheat in the system, the sub-cooling was where it needed to be, and the indoor temperature split was 20 degrees instead of over 25 degrees. I advised the customer that they did not have enough return airflow on their system and to move away from the pleated filters that they had been using. I advised using a lower MERV rating on the filters in order to deliver more airflow to the unit. I have since followed up with the customer and they said that it has been working great since the repair and the adjustment that I performed on their indoor blower motor. If you need assistance with your HVAC unit, you want things done right, and you live in Northeast Tennessee, please feel free to contact Magnolia Services based out of Johnson City, TN. Best wishes and stay safe.
Location: Jonesborough, TN
Project Image Gallery
Products Used
OEM Carrier TXV and Bi-Flow Liquid Line Filter DrierSchedule Your HVAC Service in Johnson City, TN Today!
Or Fill Out Our Quick Form!